This is the virtual multi-page printable view of this section. Click here to print.
Documentation: Manual
Please note that downloading this page as a PDF creates a static document. Any changes to the content presented cannot be included in the PDF later. We therefore advise to always use the version available online.
- 1 First steps
- 1.1 Login-Credentials
- 1.2 Certificate
- 1.3 Login
- 1.4 Mailboxes
- 1.5 Document-view
- 1.6 Search bar
- 2 For Users
- 2.1 OC-Creation
- 2.2 OC-Check
- 2.3 More Features and Tips
- 3 User profile
- 3.1 Personal data
- 3.2 Language and time zone
- 3.3 View
- 3.4 Notifications
- 3.5 Change password
- 4 Manager controls
- 4.1 Extended menu
- 4.2 Mappings and relations
- 4.3 Request user-accounts
- 4.4 Edit or delete user accounts
- 4.5 Request new password
- 4.6 Add business partners
- 4.7 Request certificate
- 4.8 Look up new business partners
- 4.9 Transmissions
- 4.10 Create new business partner
- 5 Additional functionalities
- 5.1 AutoResponder
1 First steps
This section provides all the information you need to set up the portal, as well as an overview of the key features.
1.1 Login-Credentials
Username and password
When your company-account is created in the portal, you will be the first user to automatically receive a welcome-email with your personal username and password. The email looks something like this:
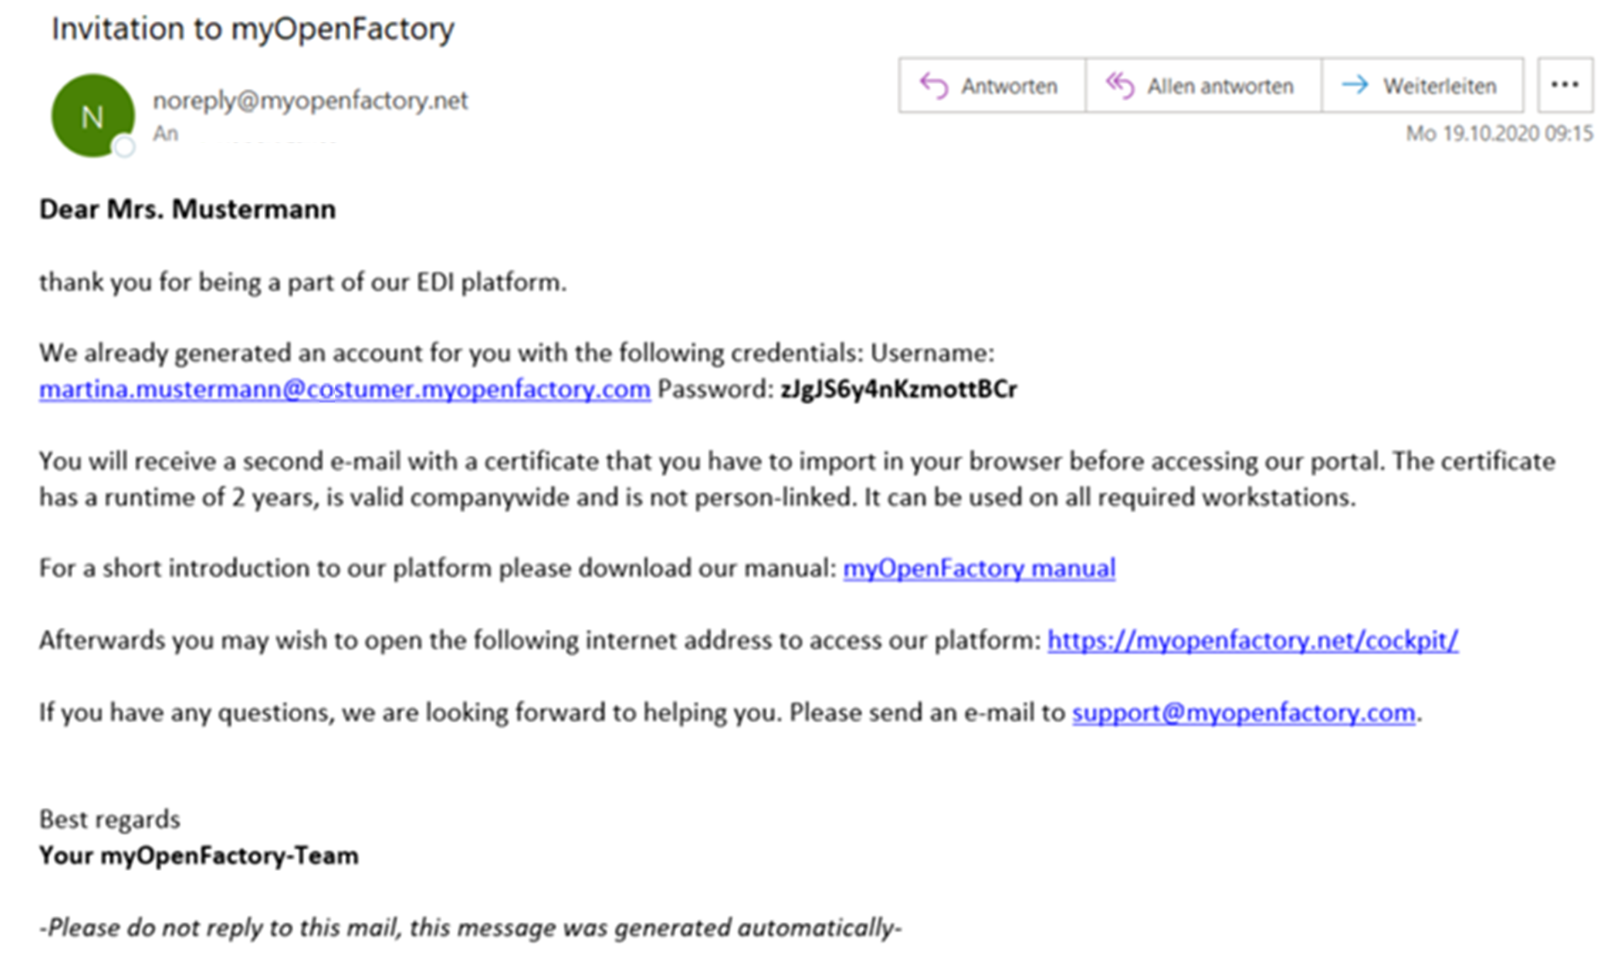
You will find your username and the provisional password, as well as a direct link to the portal. You can change the provisional password in your user profile.
1.2 Certificate
In addition to the welcome email, you will receive an email with a certificate including a password. The email looks something like this:
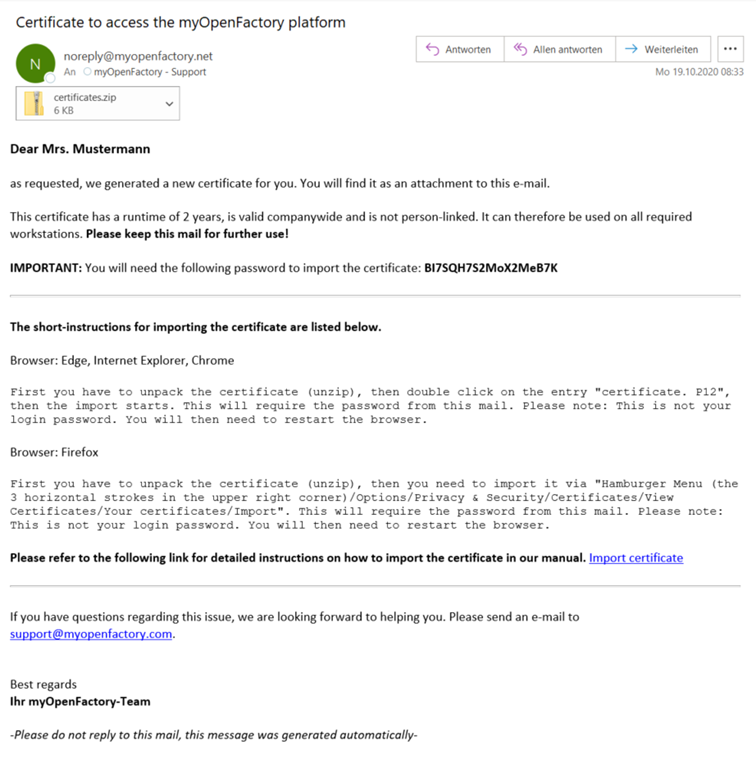
In the attachment to the email, you will find the certificates.zip, file that contains the certificate for your company. The body of the e-mail also contains the certificate password that you need to set up the certificate. We therefore recommend that you keep the e-mail secure or store it in your organization in a way that all users have access to the certificate including password at all times.
Later in the email, there is instructions on how to import the certificate, depending on your browser. You can find the instructions at Import of the certificate.
If you have not received the email, please contact our Support.
Import of the certificate
Internet Explorer, Microsoft Edge, Google Chrome
- Download the certificate from the email and save it locally to your computer
- Unzip the .zip file (Windows10 ‘Extract All’ or WinZip/WinRar/7zip or similar)
- Open the certificate.p12 file and the “Certificate Import Wizard” will start
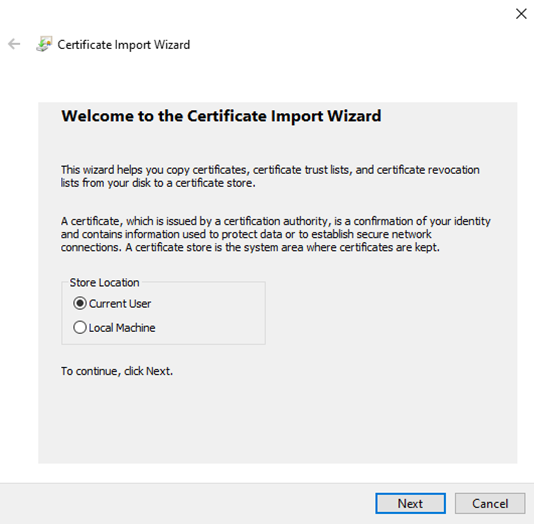
- Click on “Next” and again on “Next”
- Now enter the password from the certificate mail in the “Password” field
- Confirm with “Next”
- The certificate store of Windows is automatically suggested, again confirm with “Next”
- Click on “Finish”
- A message appears that the import process is complete
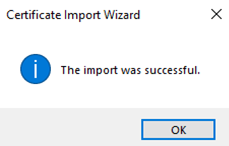
- Close and restart your browser for the change to take effect
Mozilla Firefox
- Download the certificate from the email and save it locally to your computer
- Unzip the .zip file (Windows10 ‘Extract All’ or WinZip/WinRar/7zip or similar)
- In Firefox, click on the Hamburger button (3 horizontal strokes)
- Click Settings
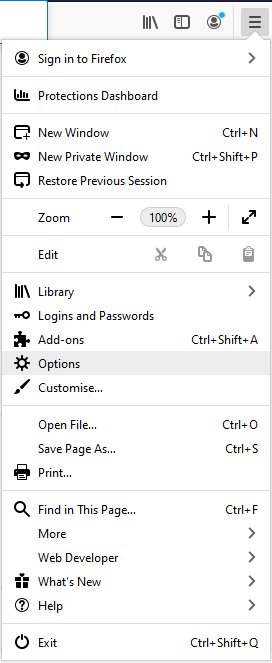
- Select the menu item “Privacy & Security” on the left side of the list
- Scroll to the bottom to “Certificates”
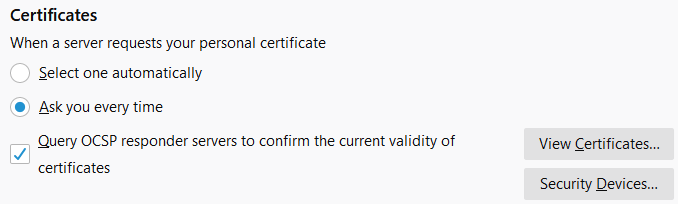
- Click “View Certificates” and a new Certificate Management window opens
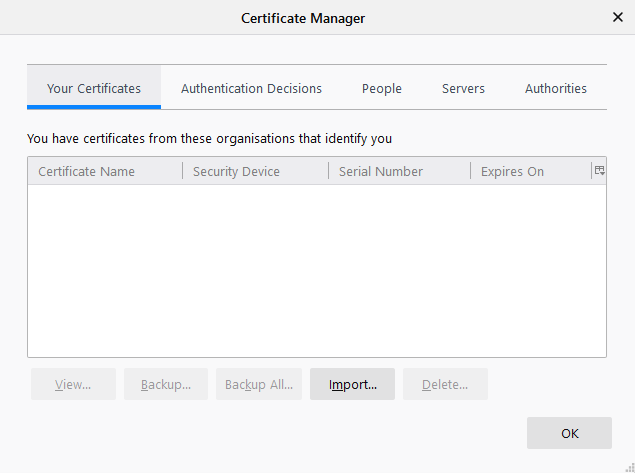
- In this window at the bottom, click “Import…”
- Then select the unzipped
certificates.p12file and confirm with “Open” - Now enter the certificate password from the email
- The certificate now appears in the list under “Your certificates”
- Close and restart your browser for the change to take effect
After importing the certificate, you can log in to the portal.
Login problems
If you have problems logging in, we recommend our myOpenFactory certificates help page. Troubleshooting certificates
1.3 Login
The Portal
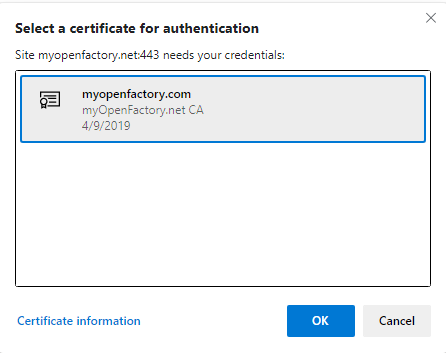
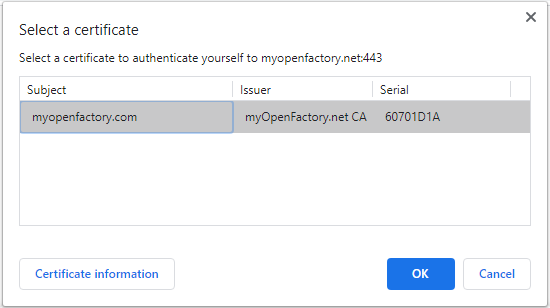
You can reach the portal at any time via https://myopenfactory.net/. Before the website is accessed, most browsers ask which certificate to use for authentication. Select the appropriate certificate (if multiple certificates are displayed) and confirm the selection.
Exampel from Microsoft Edge:
Exampel from Google Chrome:
Exampel from Mozilla Firefox:
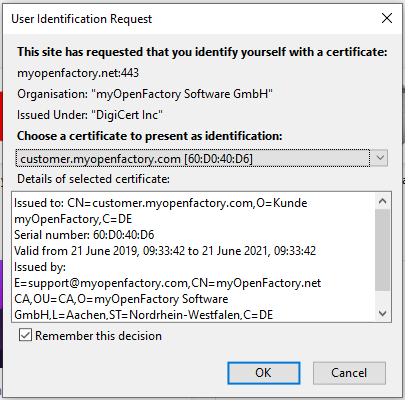
You recognize the correct certificate by the fact that it is always issued by “myopenfactory.net”. The applicant or subject is usually your company domain (as in the example “myopenfactory.com”).
The Login screen
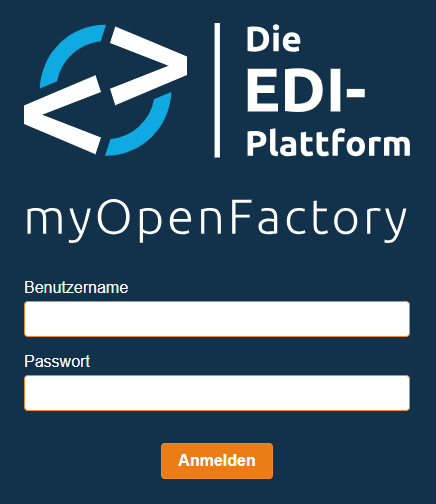
Please enter your personal username and password from the Welcome-Mail here and click on “Log in”. You will be taken to the portal and your inbox is displayed.

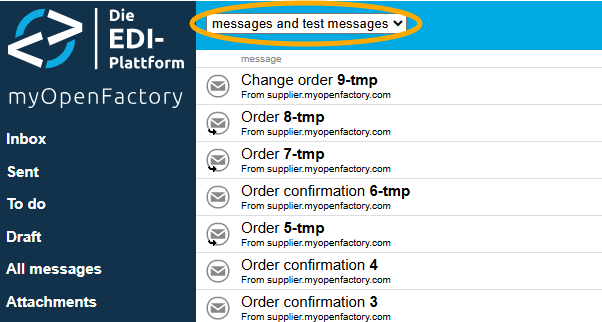
1.4 Mailboxes
Inbox

In your inbox, you will always see all EDI-documents that have arrived at you. Provided you have not adjusted the filter to view the documents. For more information about the filters, see Filters for mailboxes.
If you are purchasing via the platform, you will find all the answer documents of your suppliers here. For example, order confirmations, despatch advices and invoices. If you use the platform for your sales, you will see the orders or your customers’ quotations in your inbox.
Sent
Among the messages you send are all EDI documents that you, as a company, have sent to the platform. As a purchasing company, therefore, all orders, as a selling company, the answer documents such as order confirmation, delivery notification or invoices.
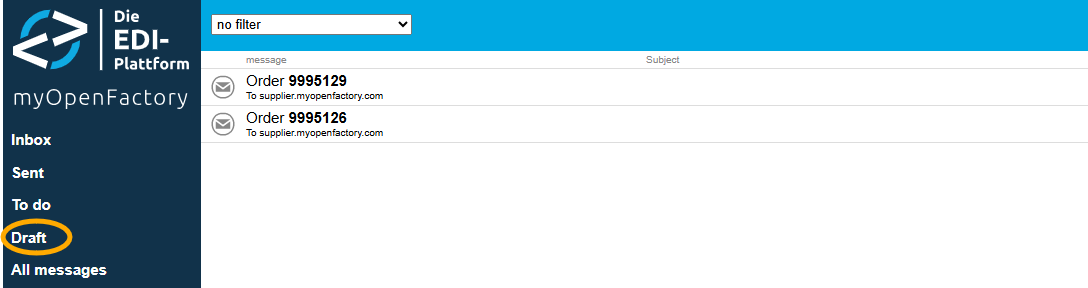
Draft (Web-EDI only)
Here you can find all documents that you have already created as a draft but have not yet submitted. If you have an ERP connection to the myOpenFactory platform, you do not create documents manually and do not need this menu item.
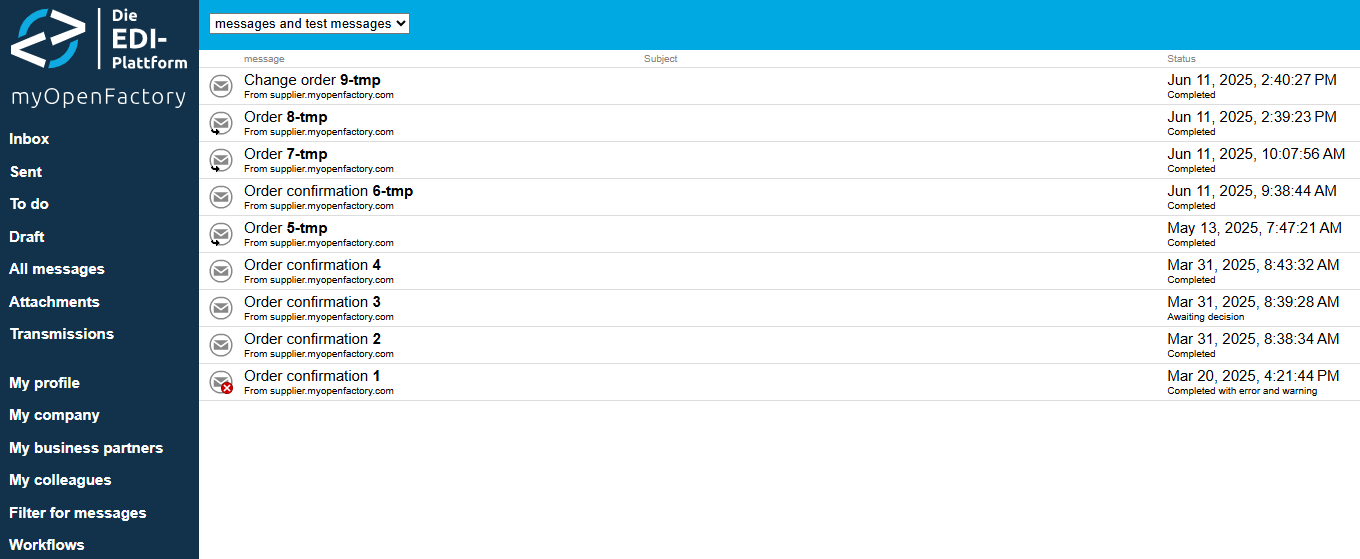
All messages
View all documents from the Inbox and Sent together.
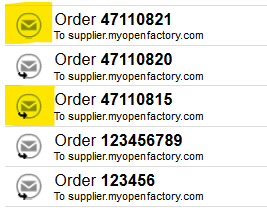
Icons
In the mailboxes, you may see the following icons to the far left of the listed messages:
| Icon | Meaning |
|---|---|
 | The message was successfully processed. |
 | The message produced an error during processing or was rejected by the recipient. |
| The message has been answered or continued. For example, an order with an order confirmation or a change order to an order. | |
 | The message has a test indicator or was sent as a test message. |
1.5 Document-view
If you want to open a document in your Inbox or in Sent, just click it.
Navigation
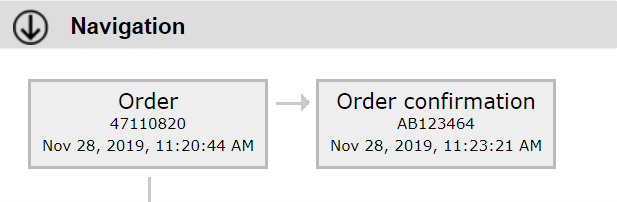
In the navigation you will find all documents that are related to this document. The chain of the documents, including the document number and the date of the documents, is displayed. Documents from the chain can be displayed in the navigation before or after the document shown. Clicking on a document in the navigation opens this document for viewing.
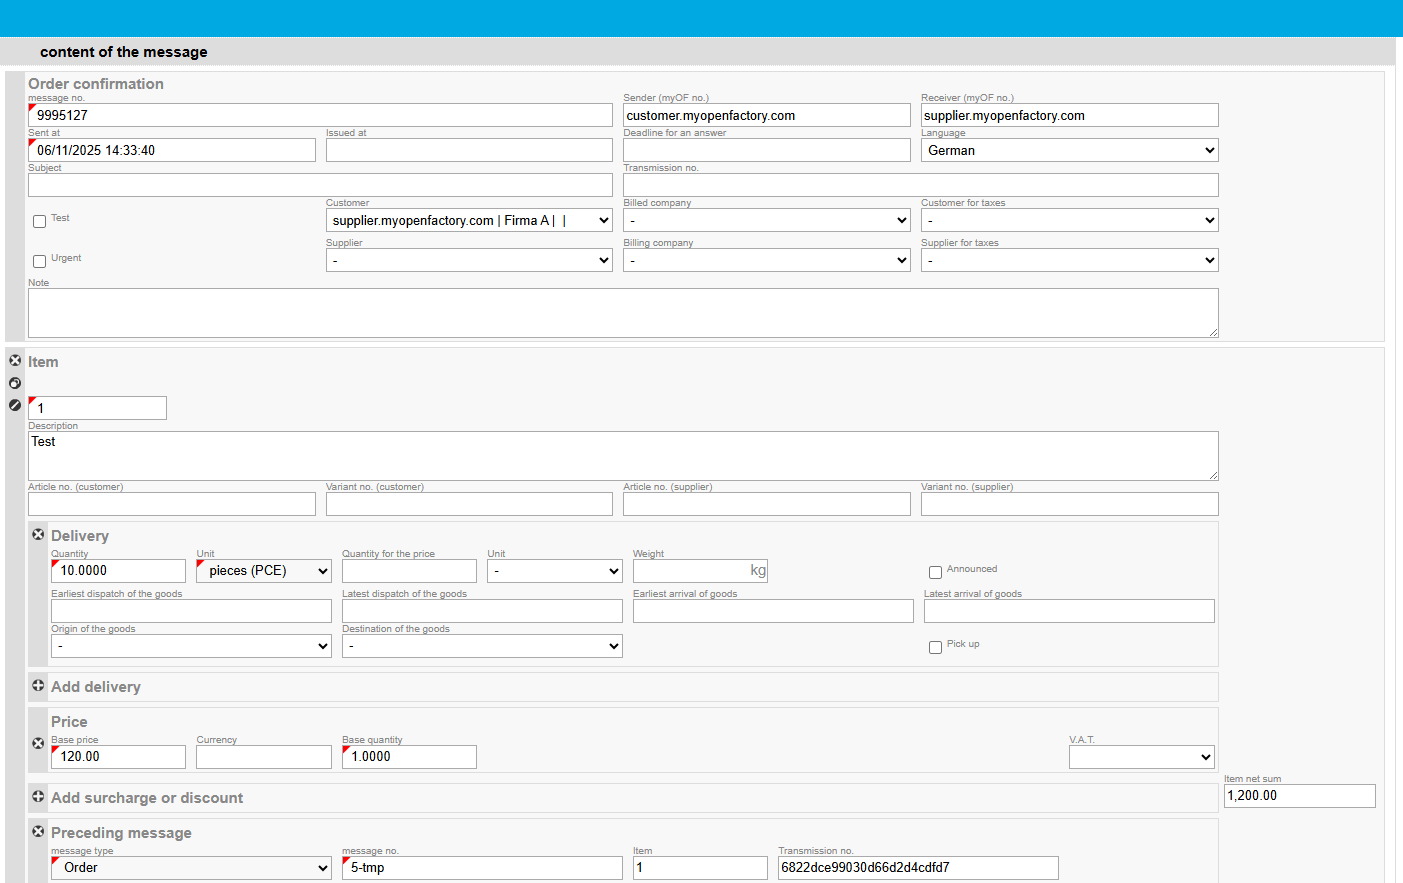
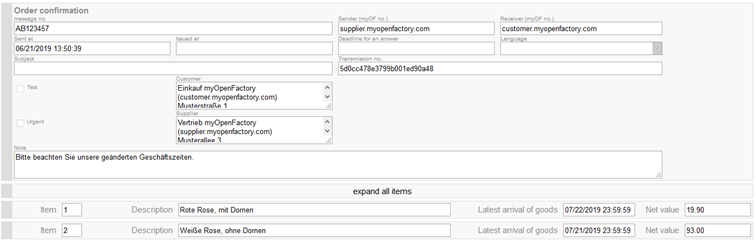
Header details
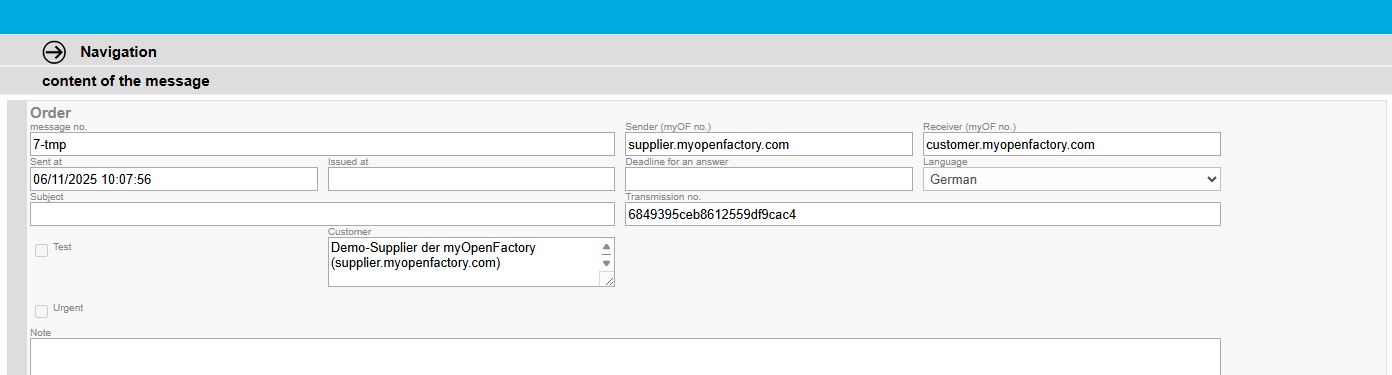
Here you can find:
- Messaage-number
- Sender and recipient
- Date
- Transmission number
- Customer and supplier (automatically filled)
Line items
Line item-overview

Here you can find:
- Line-item number
- Article description
- Delivery date
- Net amount
All line-item information
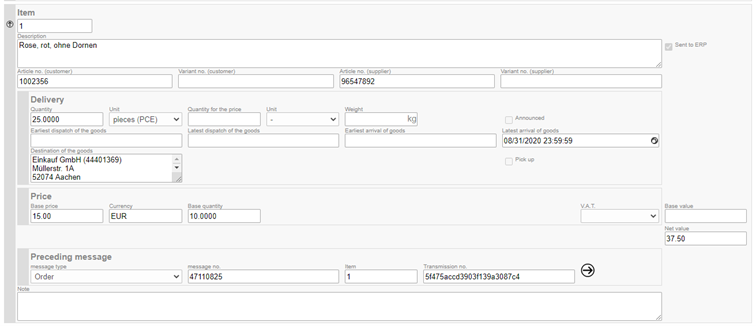
By clicking on a line item, it can be opened.
Here you can find:
- Article numbers
- Quantity, unit of measure
- Consignors and receivers
- Price
- Currency
- Base quantity
- If applicable, predecessor document

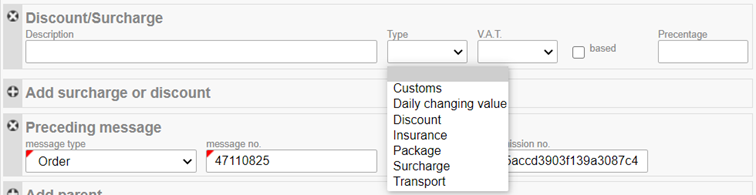
Documents that relate to other documents also have the “Preceding message” field at item level. The document type, the document number, the reference line and the delivery number are displayed here. The delivery number is a unique number that is automatically assigned by the platform and distinguishes the document from others. It is possible that a document has more predecessors. For example, an invoice can be referenced as a previous document, a purchase order, order confirmation and a delivery notification.
Total

View the total amount of the document.
Companies
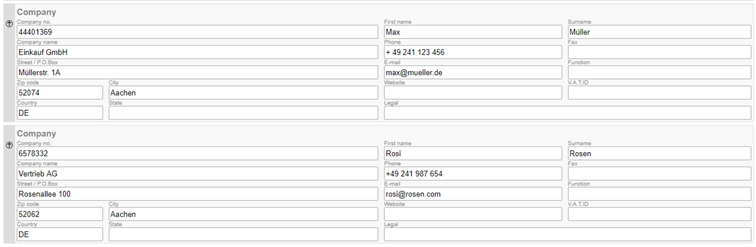
View all companies that appear as roles in the document. These are usually the customer and supplier, a goods recipient and/or invoice recipient.
Status

The status shows the technical delivery status. It does not specify the processing status of the document at the receiver´s side.
Internal Message (for Admins only)

The internal document is the format of the myOpenFactory, into which all documents are translated. From the internal document, the document is translated into the recipient’s format. It has no relevance for most users.
1.6 Search bar
You can use the search function at the top right to find the messages you want in every mailbox.

What to look for
- specific message number/ID
- company name of a business partner
- name of a responsible contact
- message type
- e.g. ORDERS, CHANGEORDER, ORDERCONFIRMATION, DISPATCHNOTIFICATION, INVOICE, CREDITMEMO
The search interval
The search interval next to the search bar enables you to limit the search to a certain period. For example, if you only want to display messages from a specific business partner from the last 3 months, you can set up the interval accordingly.
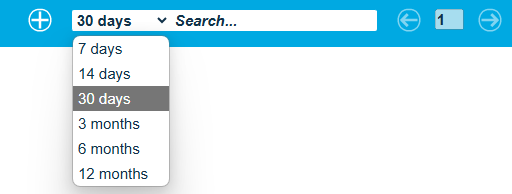
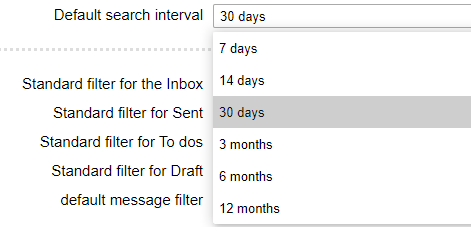
The following intervals are available:
- 7 days
- 14 days
- 30 days
- 3 months
- 6 months
- 12 months
The default search interval is set to 30 days for all users. You can change the default interval at any time in your personal profile in the view settings.
2 For Users
This section provides all the information you need to set up the portal and an overview of the most important features.
2.1 OC-Creation
Create order confirmation
- Open the purchase order for which you want to create an order confirmation
- Click on the “Answer” button in the top right corner, in the blue bar

- A pop-up opens, where you can select the document type that you want to use. When answering an order, only the order confirmation is offered
- Click on the “Create”-button
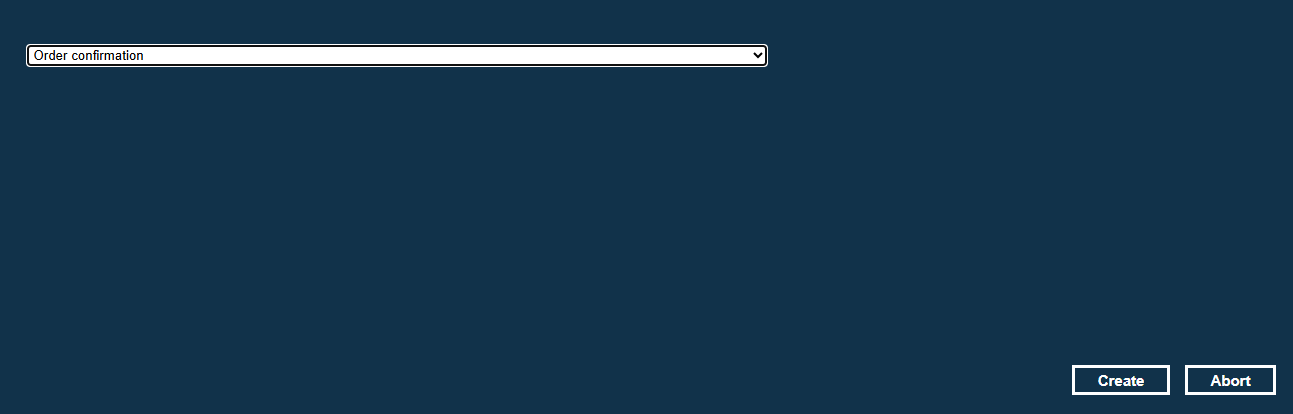
- The draft order confirmation will open
- This is already pre-filled with all information from the order
Confirm the order in its entirety
If you do not want to make any changes to the order in the order confirmation, please follow these steps:
- Click on the “Send”-button in the top right corner, in the blue bar

- A message appears that the document has been successfully sent

- Confirm by clicking on “OK”
Confirm orders with changes
If you want to make changes in quantity, delivery date or price, please proceed as follows:
Adjust quantity
- Go to the “Delivery” section

- In the “Quantity” field, you can now enter the desired quantity

Adjust delivery date
- Go to the “Delivery” section
- Click on the delivery date
- A calendar opens
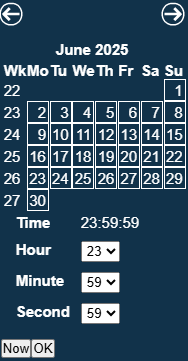
- Select the desired date in the calendar and confirm it with a click on “OK”. By clicking on “Now” you always jump to the current date.
Adjust price
- Go to the “Price” section

- Click in the “Base price” field
- Enter the new price (with comma as decimal separator)

If you have changed the price, the net value (right) is automatically adjusted.
Tips for processing of documents can be found here.
2.2 OC-Check
Opening order confirmations to be checked
Depending on the user setting, you will be notified by e-mail of each document that has been paused for review. The link contained in the e-mail takes you to the document view of the order confirmation.
Alternatively, you can open the order confirmation via your inbox. You can identify order confirmations to be checked by the “Awaiting decision” status.
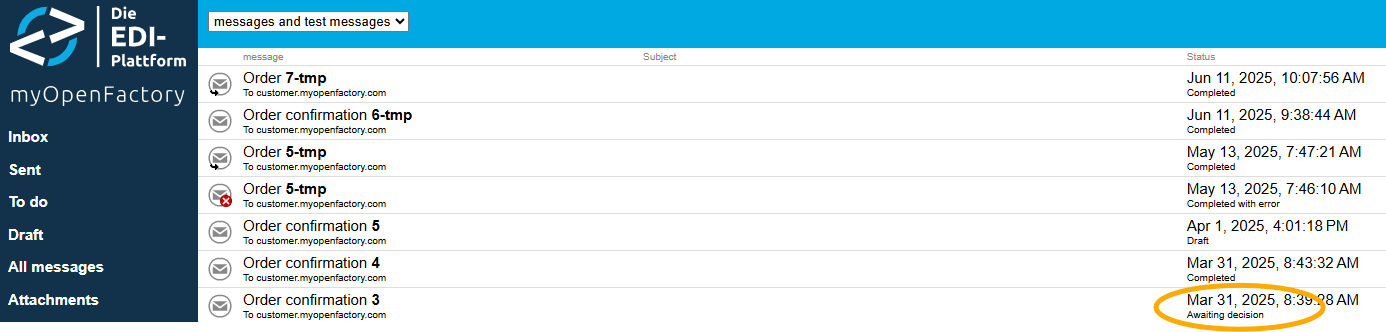
You can also set the document filter to “My open messages” to display only documents to be checked.
Types of deviations
There are two types of marked variances in the portal:
- relevant deviations (colorcode: orange)
- non-relevant deviations (colorcode: yellow)
Relevant Deviations are any deviations that fall outside the tolerance range that you defined in the portal.
non-relevant deviations are those that are within the tolerance range, or any other deviations that could still be detected by the platform.
Documents are only held for review if at least one relevant deviation has been detected. Documents with only non-relevant variances are not stopped, but the variances are still marked yellow in the documents.
The deviations
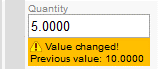
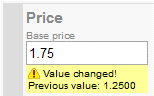
At first glance, you can see a relevant deviation (orange) in the folded position. Next to the current value, the value from the purchase order is displayed. In addition, you can recognize existing deviations by using the exclamation point on the left side of the line item box.

Here: Value changed! Previous value: 21.07.19
The line-item number, item description, delivery date, and price are displayed in the collapsed line. A deviation that refers to other values within the position is indicated with an orange marker on the left side of the position.

Then click the position to see the relevant deviation.
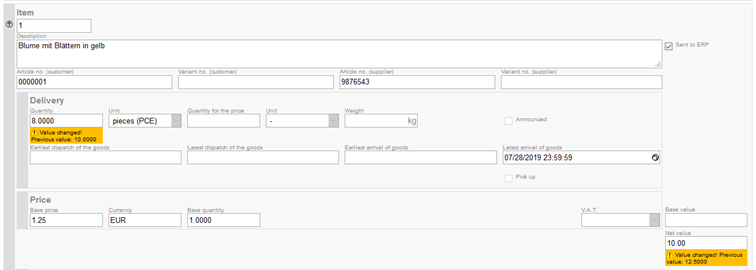
In addition to the price variance, there is a quantity variance (previous value 10 pieces, now 8 pieces), or the price deviation results from the quantity deviation.

The same applies to non-relevant deviations, whereby the color of the marking here is yellow. If both relevant and non-relevant deviations are present, the marking is colored orange.
Accept and Reject
Accept
If you agree to the order confirmation despite deviations, you can accept the order confirmation. To do this, click on the “Accept” button in the upper right corner.

A message appears that the document has been saved successfully.

Click OK to return to your inbox. The document is sent to your ERP system with the deviations.
Reject
If you do not agree with the order confirmation due to the deviations, you can refuse the order confirmation. To do this, click “Reject” in the upper right corner.

A mask appears in which you can enter the reason for the rejection.

Then click on “Reject”, your message will be saved and (if desired) forwarded to the responsible reviewer at the supplier. The message then changes its status to “Completed with error and warning” and is marked with a red X. The message will not be sent to your ERP system.

If you reopen the order confirmation, the reason for the rejection will appear at the top of the message.

2.3 More Features and Tips
Download PDF
If you would like to download a PDF of a document, you can easily do so from the document view. Simply click the printer icon in the upper-right corner.

In the next window, you can choose whether to hide features and attachments. We recommend keeping the default settings (hide features).

Depending on your browser, the PDF will either open in a new tab or be downloaded directly.
Tips for Processing Documents
Deleting Line Items
You can delete line items by clicking the X icon on the left side.

Duplicating Line Items
To simplify the creation of new line items, you can duplicate an existing one. Click the circle icon on the left side to do this.
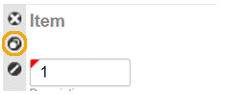
A new line item will appear, with the item number automatically incremented.
Cancelling Line Items
If you are unable or unwilling to deliver a specific article, you can cancel the line item. We recommend using the portal’s built-in function for this. To do so, click the slash icon.
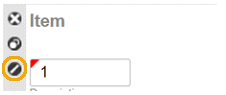
Deleting a line item to avoid confirmation is not recommended, as the customer won’t know why the item was removed and may still expect confirmation. Clicking the slash icon sets the confirmed quantity to zero, clearly indicating that the line item has been cancelled.
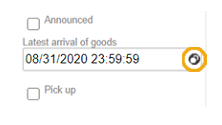
Copying a Delivery Date to All Line Items
If you want to change the delivery date in an order confirmation, you can apply the new date to all line items at once. First, change the date in the first line item, then click the circle icon to the right of the delivery date. The date will be copied to all other line items.
Adding Surcharges and Discounts
You can add a surcharge or discount by clicking “Add surcharge or discount” (located just below the price). Then enter the description, type, and percentage.
Adding Payment Terms
Click “Add Condition” to add payment terms. Please note that this should be agreed upon in advance with your customer. You will need to specify the description, number of days, and percentage.

Saving Drafts
If you’ve started editing an order confirmation but are not ready to send it, you can save it as a draft. Click “Save” in the upper-right corner.

A message will confirm that the document has been saved. You can find it under “Drafts” in your folders and continue editing it at any time.
Cancelling Drafts
To cancel a draft, click the “Abort” button in the top-right corner.

3 User profile
In this section you will find all the information and settings that affect you personally.
3.1 Personal data
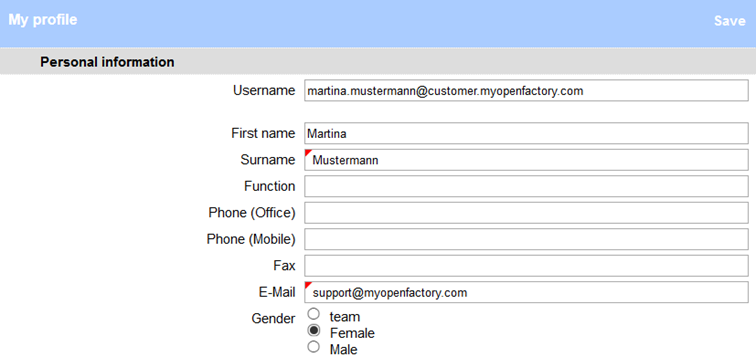
Except for your username, you can edit all fields here. After the change, simply click “Save” in the blue bar in the upper right corner. If you want to change your name for personal reasons, please contact our support team.
3.2 Language and time zone

You can choose from German and English for the languages.
All valid time zones are selectable.
3.3 View
Message view

By default, the first two options are checked here. “Collapse item list” refers to the display of a document. If a document has many line-items, an overview of all line-items without a detailed presentation of them can be very helpful. Line-items can still be opened by clicking on them.
Line-item
Collapsed Line-item:
Unfold line-item:

Message view
The field " Display parent or child message icon " refers to the symbol in the mailboxes next to the documents.
If the function is unchecked, the message-display loads much faster. As a rule, however, this is not needed and can remain activated.
Default search interval
Here you can set which search interval is used by default for your search in the mailboxes.
Filters for mailboxes
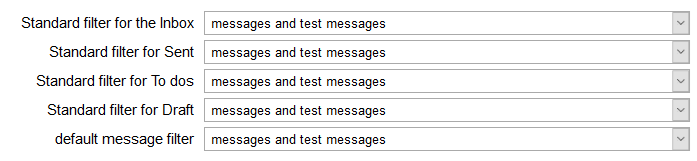
Here you can set invidual filters for each mailbox. These can then be found at the top of the mailboxes.
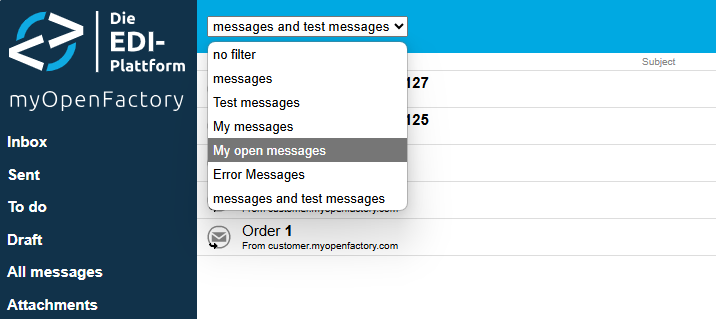
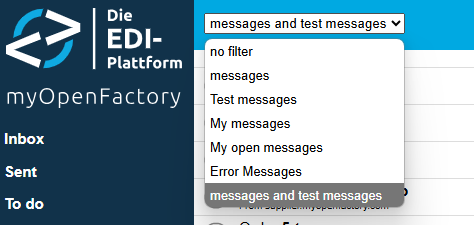
The messages that match the name of the filter are always displayed. Here, for example, test messages and productive messages. You can change the filters in the dropdown-menu of the mailboxes at any time manually, in your profile you can set the default filters.
Overview of the message filters
| Name of the filter | Action |
|---|---|
| no filter | All messages are displayed |
| Messages | displays only productive messages |
| Test-messages | displays only test-messages |
| My messages | displays all documents that are assigned to you |
| My open mesasges | displays all messages that are still waiting for a decision from you |
| Error-messages | displays all messages with an error |
| Messages and test-messages | displays all productive and all test documents |
3.4 Notifications

Substitution
Under “Temporarily substituted by” you can set your representation from the existing users. In your absence, the selected user will receive all notifications (by mail) that you would otherwise have received.
Notification via e-mail
| Inform me if … | Action |
|---|---|
| A new message is available | You will receive an e-mail from each incoming message (see Inbox) |
| A new message or receipt is available | You will receive an e-mail from each incoming message and receipt (see Inbox) |
| A message has an error | You will receive an e-mail for each defective message |
| never | You will not receive any notifications from us by e-mail |
By default, the notification of errors is set.
Please note that these settings only apply if you have been selected as the responsible user for the messages. If you have any further questions, please contact the key user (manager) at your company or a contact person at your supplier.
Add message additionally as PDF
If you have stated that you would like to receive an e-mail for newly arrived documents (if you want to be informed, for example, of incoming orders from your customers), then you can have the order sent directly to you as a PDF-file. To do this, you only need to activate the check-box and save it in the upper right corner.
3.5 Change password

You will initially receive a random password from us. Here you can change this to a password that you can remember better (or more meet your security requirements).
4 Manager controls
This section provides all the information you need to set up the portal and an overview of the most important features.
4.1 Extended menu
As manager, even more menu points appear on the left side of the blue bar. Here you get an overview of the additional content.
While the user can only see “My Profile”, the manager can also make even more settings in the portal.
My company
Under “My Company” you can see an overview of all data set up or created for your company. All tabs can be viewed here, but editing is only possible by the employees of myOpenFactory. The only exception is the “Certificates” tab, which can also be used by you as a manager.
My business partners
Here you can see all connections made between your company and your customers and/or suppliers through the platform. A distinction is made between productive connections and test connections. Test connections can be recognized by the yellow T symbol to the left of the company name.
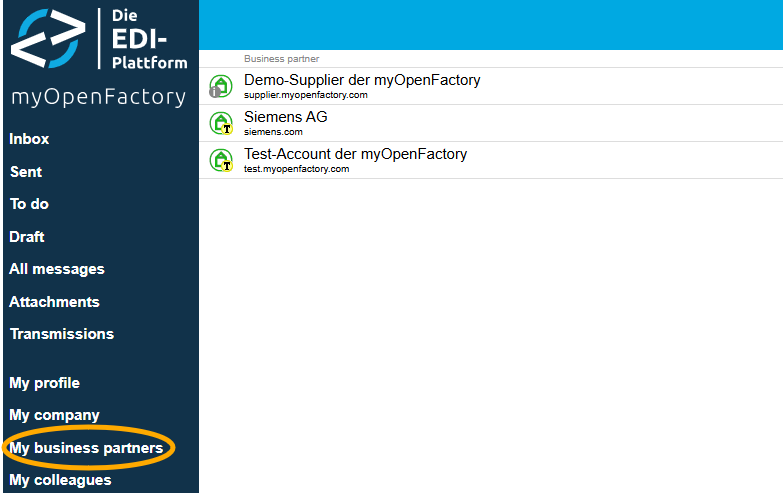
We also distinguish between independent and sponsored business partners.
Independent business partners are companies that have concluded their own users contract with us and therefore bear the costs for participating in the EDI platform themselves. You can recognize them in the overview of business partners by the green house symbol:

sponsored business partners are companies for which independent business partners bear the costs for participating in the EDI platform. You can recognize them in the overview of business partners by the grey house symbol:

My colleagues
Here you can see all employees from your company who also have access to the portal. You are not listed here because you always make your personal settings under “My Profile”.
Filter for messages
There are already 6 standard filters in the mailboxes that can be selected. Here you can set up additional filters. However, we always recommend that you configure this in consultation with the myOpenFactory staff. If you need a filter, please contact us!
Workflows
When your company is created in the portal, your company is always set up with a standard workflow. There you can configure which document types can be processed, and you can also set mappings for unit of measure, country indicators, surcharges and other values. Again, we recommend that you make changes only in consultation with the employees of myOpenFactory.
4.2 Mappings and relations
Under the menu item “My business partners” you will find an overview of all your connected business partners. When sending documents to your business partners, you must enter all customer or supplier numbers that you use for your business partners here. Additionally, incoming mappings can be made here if your business partners use different IDs/numbers than those you expect.
Outgoing relations
If you manage your purchasing processes via EDI, you must enter the supplier number(s) from your system in the corresponding supplier settings under “outbound relation”. If you manage your sales processes via EDI, enter the customer number(s) in the business partner settings.

Click on “Add outbound relation” for this purpose and an input field will open. Enter the relevant number there and click on “Save” at the top right. If you open this business partner again, you will see the relation you have just saved. All documents containing this number will now automatically sent to this business partner.
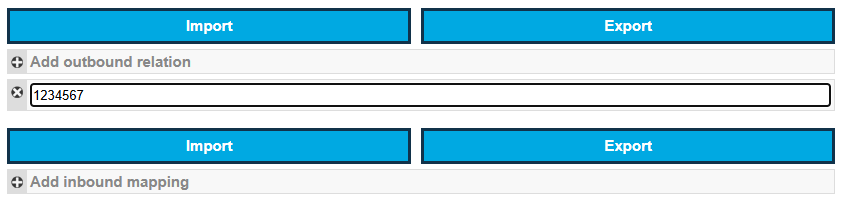
Incoming mappings
If a customer or supplier uses an ID or number for a role/company that your system cannot assign, you can store a mapping on the platform.
Example:
Your customer sends their order with the customer number “987654321” from their system. However, you would like to receive the customer number “0815” that you have assigned to identify the customer in your system.
To set up a mapping, click on “Add inbound mapping”, which will open 2 input fields separated by an arrow. In the left field, enter the initial value for example, the number “987654321”. In the right field, enter the target value, here for example, “0815”. Then save at the top right. If you open this business partner again, you will see the mapping you have just saved. In all incoming documents, the left number will now be replaced in the company numbers by the right number.

Import and export of relations and mappings
If you use a lot of numbers for a partner, we recommend importing the numbers instead of saving them manually. The same applies to incoming mappings.
Import of outgoing relations
If you want to import outgoing relations, each line in a CSV file should contain a number. The file extension must always be “.csv”.
Example:
987654321
666555
33367
4711
0000632
55638
To start the import, click on “Import” above the outbound relation. This window will then open:

Click on “Select file” to select the file from your PC. Before importing, you can now decide whether existing mappings should be overwritten or if the new numbers should be added additionally. If you select “overwrite existing values”, all previous mappings will be deleted and replaced by the newly imported numbers. Finally, click on “Import” to immediately display the new mappings.
Export of outgoing relations
If you want to export the existing relations, e.g. to add them, click on the “Export” button above the relations. This will start the download of the mappings as a .csv file.
Import of incoming mappings
Prepare a CSV file with the initial value in the first column and the target value in the second column. Each pair should be in one row, separated by a semicolon. Click on the “Import” button. A window will open in where you can select a file to import. You can choose whether existing values should be overwritten or supplemented. Finally, click on “Import”. The mappings will be displayed immediately.
Example:
987654321;0025687
666555;3400175
33367;776631
4711;0815
0000632;632
55638;160374
Export of incoming mappings
If you want to export the existing mappings, e.g. to add them, click on the “Export” button above the mappings. This will start the download of the mappings as a .csv file.
4.3 Request user-accounts
Before you start, always check whether a colleague already has access to the portal. If a large number of colleagues already exists in your company account, you can also use the search mask at the top right for quicker orientation.
- Click on “My colleagues”
- In the upper right corner, click the + icon
- A pop-up opens in which you can enter your colleague’s data.
- If you have filled in all the fields, click on “Create”
- The message appears that the request has been successfully forwarded.
If you added a new user, the request is always checked by an employee of myOpenFactory first. So the new colleague does not appear directly under “My colleagues” and it may take a moment for the user-request to be processed.
When the user is shared, the user will automatically receive an email with a user name and password. Please always provide all new users with the certificate that you received as a manager at the time of setup. Certificates are valid company-wide, so all employees in a company should have the same certificate in use.
4.4 Edit or delete user accounts
If one of your colleagues has left the company or is no longer responsible for using the portal, you can and should delete the user concerned.
- Click on “My colleagues”
- Click on the user you want to delete
- Click “Delete user” at the top right
- A pop-up window will appear asking if you are sure.
- Click on “Delete” here
- A message appears that the request has been successfully forwarded.
If a user is to be deleted, the deletion is always checked by a myOpenFactory employee. We have to check whether the user is stored in the portal for a relevant function and needs to be replaced. It may therefore take a moment before the user is no longer visible.
If you would like to make a change to an existing user account, you can simply change the relevant values and then click on “Save” at the top right. If a user’s name changes, e.g. due to divorce or marriage, you can change it yourself. Our support team will adjust the user name for you on request.
4.5 Request new password
As a manager, you are the central point of contact for your colleagues. So if one of your colleagues has forgotten his password to log in to the portal, you can request a new password for him/her.
- Click on “My colleagues”
- Click on the user you want to receive a new password
- Click on “Request a new password” in the upper right corner and confirm the message with “Create”
- A message appears that the request has been successfully forwarded
The new password is generated by an employee of myOpenFactory and then automatically made available to the user by e-mail.
4.6 Add business partners
- Open “My business partners”
- Click on “Available partners” in the upper right corner
You will now see all partners who have any connection to the myOpenFactory platform (sponsored or independent).
- In the search box, enter the name of your business partner and confirm with |Enter|
- Select the correct partner by clicking on the company name

- Click “Save” in the top right corner to add the partner to your business partners
- A message appears that the business partner has been successfully saved
You are now back in the Business Partner view and the new partner will appear in your list. All partners that are newly added are by default in test state (indicated by yellow field with “T” next to the company name).
Test or productive connection
When a business partner is added to your business partners, the entire connection is always in test status. Since tests should be carried out before each productive connection, the platform ensures that no goods are sent by mistake. Regardless of whether you send a test flag in your messages or not, all documents are will arrive as test-messages at the receiver.
If you would like to set a connection to productive state after completing the tests, please contact our Support team.
Sponsored or independent business partner
In the overview of available business partners you can see whether you will incur costs as a result of connecting a specific partner.
Independent business partners are companies that have concluded their own users contract with us and therefore bear the costs for participating in the EDI platform themselves. You can recognize them in the overview of business partners by the green house symbol:

sponsored business partners are companies for which independent business partners bear the costs for participating in the EDI platform. You can recognize them in the overview of business partners by the grey house symbol:

4.7 Request certificate
Certificates are always valid for 24 months, after which they must be reissued. In order to inform you in good time of the expiry of the validity of your certificate, notice messages will appear in the portal from 60 days before expiry.

Here you can request a new certificate directly via the link in the yellow box.
For users without manager rights, the following message appears:

This way, each employee is informed which colleague has the current certificate.
A new certificate is not automatically sent for security reasons. Therefore, you can apply for a new certificate from about one week before the current certificate expires:
- Click on “My Company”
- Open the “Certificates” tab
You will now see an overview of all certificates already issued, including validity and recipient of the certificate.

- Click on “Request Certificate”
- A new mask opens in which you must select the user to receive the certificate. Since it should be the key-user, probably it is you.

- Confirm the user with “OK”
- A message appears that the request has been successfully forwarded.
As with new users, the request is always checked by an employee of myOpenFactory. When the certificate is generated, the previously selected user automatically receives an e-mail with the new certificate. Only then will the new certificate be listed under “Certificates”.
4.8 Look up new business partners
- Open “My business partners”
- Click on “Available partners” in the upper right corner
You will now see all partners who have any connection to the myOpenFactory platform (sponsored or independent). In the upper right corner you see two icons left from the search-field.
Now you can filter the list by name (ascending and descending). You can switch the list by clicking on the icon again.![]()
Or you can filter the list by the creation-date of the business-accounts (ascending and descending). You can switch the list by clicking on the icon again. This is especially useful if you want to regularly check which companies were recently added to the platform.
If you would like more information about the company you´re intereted in, you can always contact our Support team to gather information about whether the company is productive yet, is it selling or purchasing and which message-types are in use.
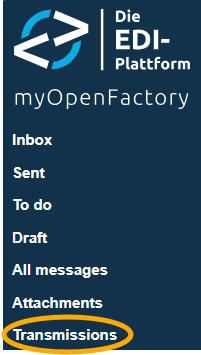
4.9 Transmissions
From menu item “Transmissions”
As a manager, you can see the menu item “Transmissions” in the blue bar on the left.
Click on this menu item to get an overview of all incoming and outgoing transmissions. You will receive information on the transmission path used for each direction (e.g., HTTP from myOpenFactory and HTTP from the customer) the times of the transmissions, the file sizes and whether a process has already been completed.

Here you can view individual transmissions and download the necessary documents.
From documents
If you want to see the transmission for a specific document on the platform, you can do this from the document in question. To do this, simply click on “Status” tab under the document:

If you click on this status, you will find the transmission to this document at the end before the receipts.

If you click on the link there, you will be taken directly to the transmission overview. Here you can view and download the document sent to you or sent to us by you.
If you would like to download this file, click on “Download” in the horizontal blue bar at the top right.
4.10 Create new business partner
- Open “My business partners”.
- Click on “Available partners” in the upper right corner.
All available business partners that are either sponsored or independent are displayed.In the upper right corner you will also find the search bar and two filter elements. If it turns out that the desired business partner is not yet connected, you can create a new business partner on the platform, if you have agreed on a new EDI connection via out platform.
Hit the “+” icon next to the search bar. A blue pop-up appears.
The connection type depends on the agreement you made with your partner.
- Does your customer or supplier have an ERP system with an EDI interface and wants to exchange data via EDI with you? Then choose ERP connection (sponsored).
- Your supplier doesn’t have an ERP system or a system which is not able to perform EDI processes? Then choose WebEDI supplier (sponsored).

- In the next step, enter the data of your business partner. On the left we are expecting company data and on the right we are expecting data about the contact person.
Mandatory:
- Company name
- name of the contact person at your business partner
- Email address of the contact person at your business partner
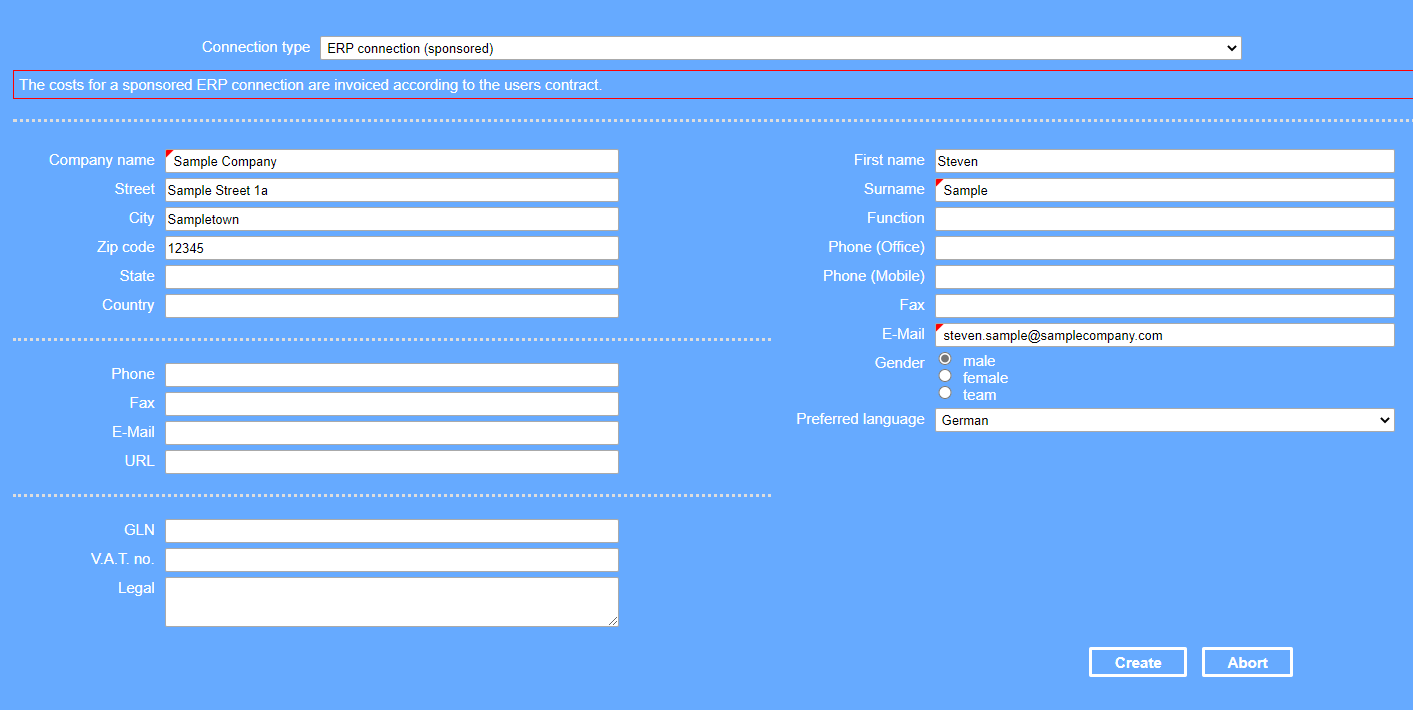
Click Create.
A notification is displayed that informs you about our team checking your request.
Your request will now be checked by our of staff members. If the request is approved, your new business partner can be found under “My business partners”. By default, all partners that are added appear in test state (yellow box with “T” next to the company name) until you want us to change it to production.
Here you can find further information as a sponsor of WebEDI supplier: Requirements WebEDI
Sending login data and certificate
For WebEDI
Two Emails are sent to the contact person you entered in the request.
- One E-Mail including the username and password of the user and a link to this manual and to the portal.
- One E-Mail including the certificate and certificate password for authentication.
A guide on how to use the certificate can be found here: How to use the certificate.
For an ERP connection
Sponsored partners with an ERP connection usually do not get access to the portal. The contact of your sponsored partner is required though to set up the connection between your partner and the platform. Please make sure to loop us in in mail conversations with your partner. This way we can clarify all technical questions directly with your partner.
5 Additional functionalities
5.1 AutoResponder
Purpose of the AutoResponder
The business partner “AutoResponder der myOpenFactory” enables you to send test documents and to automatically receive response documents without contacting our support.
By using defined commands, you can influence the behavior of the AutoResponder. For example, you can trigger an order confirmation with deviations to test the deviation check of the platform or of your ERP system.
Procedure
Add the AutoResponder as a business partner.
To do this, go to “My business partners” and enter “AutoResponder” in the search mask in the upper right corner. Then click on this business partner:

and then click „Save“ in the upper-right corner.
Now this account has been added to your list of business partners.
Send a message with the desired content and address it to the myOpenFactory ID (myOF ID) of the AutoResponder. This is: autoresponder.myopenfactory.com.
Procedure for using WebEDI:
If you create a document manually in the portal, you can simply select the recipient “AutoResponder der myOpenFactory“ from the drop-down menu.
Now you can enter the commands below in the note field in the draft-view of the message (note-field in the header).Procedure for ERP-connection:
If you want to send a document directly from your ERP system, you must enter the myOF ID “autoresponder.myopenfactory.com” in your system as a customer- or supplier-number for a test account. Now you can enter the commands below in the “Note field” in the header (Body.Note) or in the “Subject” of the message. You can also use several commands in one document.
In addition to the name of the command, you can also specify the desired deviation. This is done using the parameters in the second column of the table. The syntax is as follows: A command is initiated with # and the parameters are separated by a colon. #COMMAND:PARAMETER
Commands
| Name of Command | Parameter | Description | Command |
|---|---|---|---|
| MIRROR | none | Mirrors a document so that you get back exactly the document you sent - Exception: SenderID, ReceiverID, TransmissionID | #MIRROR |
| WORKFLOWRESPONSE | none | Modifies MessageTypeID as described in the standard 5.0 default workflow. | #WORKFLOWRESPONSE |
| CHANGEITEM | ITemID [ItemID] - without ItemID all line-items will be changed | Modifies quantity and price of items. | #CHANGEITEM:1,4 |
| SETTYPE | MessageTypeID | Responds with the specified document type. The document types can be found under this table. | #SETTYPE:INVOICE |
| SETMESSAGEID | Message ID | Sends back the specified document number. | #SETMESSAGEID:12345 |
| CHANGESENTDATE | DATEMODIFIER | Responds with a correspondingly changed send-date. Please note the rules below. | #CHANGESENTDATE:+2MONTHS-5HOURS |
| CHANGEDISPATCH | DATEMODIFIER, [ItemID] | Changes the latest shipping date for the specified items or for all items. | #CHANGEDISPATCH:+5DAY,2,5 |
| CHANGEDISPATCHEARLIEST | DATEMODIFIER, [ItemID] | Changes the earliest shipping date for the specified items or for all items | #CHANGEDISPATCHEARLIEST:+5DAY,2,5 |
| CHANGEARRIVAL | DATEMODIFIER, [ItemID] | Changes the latest delivery date for the specified items or for all items | #CHANGEARRIVAL:+5DAY |
| CHANGEARRIVALEARLIEST | DATEMODIFIER, [ItemID] | Changes the earliest delivery date for the specified items or for all items. | #CHANGEARRIVALEARLIEST:+5DAY,2,5 |
Message-types / MessageTypeID
| Message-type | MessageTypeID |
|---|---|
| Order | ORDER |
| Order response | ORDERCONFIRMATION |
| Change Order | CHANGEORDER |
| Despatch Advice | DISPATCHNOTIFICATION |
| Invoice | INVOICE |
| Credit Memo | CREDITMEMO |
Examples
| Command | Impact |
|---|---|
| #CHANGEITEM | changes all quantities and prices in all items |
| #CHANGEITEM:1,4 | changes quantities and prices in items 1 and 4 |
| #CHANGEDISPATCH:+1DAY-25MINUTES | adds 1 day to the dispatch date and subtracts 25 minutes from the time |
| #CHANGEDISPATCH:+5DAY,2,5 | adds 5 days to the dispatch date for items 2 and 5 |
| #CHANGEARRIVAL:-2DAY | moves the delivery date forward 2 days |
Parameter DATEMODIFIER
To change a specific date, please stick to the following rules:
The following characters and data are allowed:
- The character - and +
- The numbers from 1 to 9
- The dates: YEAR, MONTH, DAY, HOUR, MINUTE, SECOND (singular or plural)
Example:
+2MONTHS-5HOURS+1MINUTE
Using several commands
If you want to use several commands in one message, you can list them one after another with a blank space or a line break inbetween the commands.
Space example:
#CHANGEITEM
#CHANGEDISPATCH:+2DAY
Line break example:
#CHANGEITEM
#CHANGEDISPATCH:+2DAY
Advanced features
- The MIRROR command ensures that you get back exactly the document you are sending. Therefore, further commands in the remarks field would be ignored.
- The commands are processed in the order in which they are shown in the table, see Commands.